Embedded Checkout
WePay offers a Credit Card iFrame, which is a simple, pre-built user interface where a payer submits their credit card information directly to WePay. WePay will only collect credit-card information, and it won’t touch your servers. A token is then returned via JS, which your platform can then use to securely create checkouts.
Embed Credit Card iFrames
In order to use the Credit Card iFrame, first start by making sure you’ve implemented the WePay Tokenization Javascript library.
From here, at a high level, there are 4 steps:
- Append credit card iFrame on an HTML element which has an id of “iframe-element”. You’ll run the code in the JS library like so:
WePay.createCreditCardIframe('iframe-element', options);, withoptionsbeing a Javascript variable defining the look and feel of the iFrame. - Present iFrame to payer, and collect
client_id,user_name,email,address, andpostal_code. Collect these fields through your own User Interface and experience. Do not collect credit card information, as the iFrame will collect this. - Call
tokenize, which combines information from the previous step, plus credit card information, and receive Credit Card Token. - Execute a payment with the checkout API using the Credit Card Token from the previous step.
You can modify the CSS of the iFrame, by passing an object as the second argument in the createCreditCardIframe call. The structure is presented below:
var options = {
	'custom_style' : {
		'styles': {
			'base': {
				'border-color': '#ccc',
				'transition': ' border-color 0.6s linear, border-width 0.6s linear',
				'border-radius': '5px',
				':hover': {
					'border-color': 'black'
					},
					':focus': {
						'border-color': '#969696'
					},
					'::placeholder': {
						'color': '#ccc'
					},
					'::selection':{
						'color': 'red'
					}
			},
			'valid': {
				'border-color': '#5ca96d',
			},
			'invalid': {
				'border-color': '#d26172',
			}
		}
	}
};
Per the example above, you can modify the following three class names:
basevalidinvalid
These represent the default viewing behavior, valid credit card information, and invalid credit card information user experiences.
These are the modifiable CSS properties & pseudo-classes:
border-radius,border,font-size,font-weight,font-family,font-smooth,font-style,font-variant,letter-spacing,padding,text-decoration,text-shadow,text-transform,border-color,transition,color,appearance,:hover,:focus,::placeholder,::selection
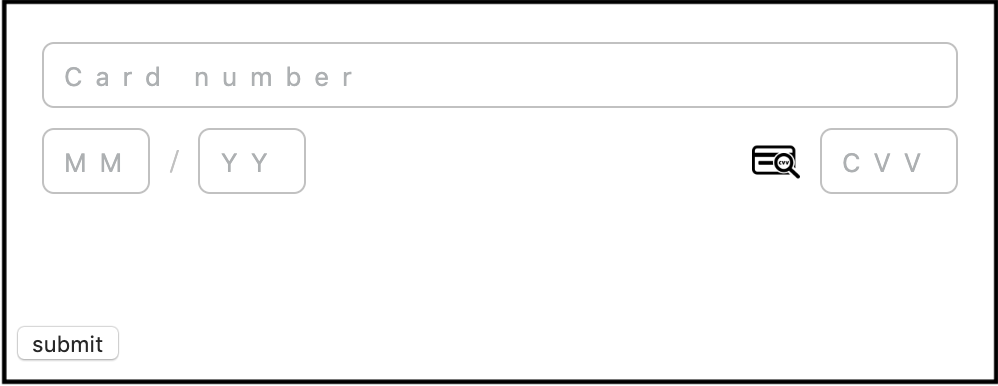
Example (Credit Card iFrame)
- HTML
Sample credit card iFrame UIs:

Next Steps
Now that you’ve successfully charged a payer, your merchant will have money in their WePay payment account. The next step is to let the merchant verify their identity and link their bank account.
Deprecated Embedded iFrame Checkout
Note
This feature is deprecated, and can no longer be integrated.
How does it work?
There are 3 steps to using the iframe:
- Make the /checkout/create call to get a
checkout_idandcheckout_uri. - Embed the
checkout_uriin an iframe on your site. - Handle the confirmation page the payer ends up on after paying.
Step 1
To get started, you will create a checkout with the /checkout/create call. The checkout object represents a single payment. You’ll pass in the account_id and access_token you got when you created the merchant’s payment account. The redirect_uri that you set is where the payer will end up after they finish the payment flow (typically a confirmation page on your site).
Features
- Implement
hosted_checkout.fallback_uriin order to successfully present the iframe in browsers which do not accept third-party cookies. Read more about fallback URI. - Use
unique_idto protect against duplicate transactions. Read more in the Best Pratcies article and /checkout/create API reference. - Provide a
callbacki_urito receive updates about the checkout. Read more in the IPN article. - Include the relevant rBits to help WePay process the transaction and to protect your users. Read more in the Risk Certification.
- To limit the available payment methods in an iframe, use the
hosted_checkout.funding_sourcesparameter on the /checkout/create call. Funding sources can be limited to eithercredit_cardorpayment_bank.
- PHP
- cURL
- Ruby
- Python
In the response you will get a checkout_id and checkout_uri which you will use in step 2.
Step 2
Now that you have a checkout_uri, you should embed it in an iframe on your site. Here is some sample code that will let you do that:
- HTML
The payer will see the payment flow inside the iframe and will be able to enter their payment info and confirm the payment.
Step 3
Once the payer has confirmed their payment, their payment method will be charged and they will be sent to whatever redirect_uri you specified in step 1. The checkout_id will be appended as a GET parameter so you can look up the payment details.
Note that if you don’t specify a redirect_uri, the payer will not be redirected and will instead see a confirmation page inside the iframe.