Building an Online Marketplace with WePay and Rails
This tutorial will teach you how to build an online marketplace from scratch. Popular marketplaces include Airbnb, Etsy, and eBay.
It includes six easy steps, and it should take you less than an hour to complete. By the time you’re finished, you’ll have built a sample application that facilitates payments between buyers and sellers.
- Getting Started
- Models
- User Authentication
- Integrating the WePay API
- Enabling users to accept payments
- Integrating checkout
1. Getting started
You should follow this tutorial step-by-step. Each section is necessary to complete the sample application. You can download all the code for the sample application on Github. At any time you can play with the live demo on Heroku.
We’re going to build WeFarm, a sample Rails application that uses the WePay API to help farmers sell produce online (think of it as an online farmers’ market).
Suggestion
The WePay API lets you instantly enable users (in this case, Farmers) to accept payments online. It supports a seamless user-experience on your platform, while shielding your application from fraud and regulatory complexity. It’s the easiest way to support payments in your marketplace.
First, you’ll need to install Ruby on Rails, create a basic Rails project, and connect your application to a database. This tutorial uses a MySQL database, but you can use any compatible database for your application. Learn how to get started with Rails here.
$ rails new wefarm -d mysql
We’re also going to use Twitter Bootstrap as our front-end framework, so you should add the Bootstrap files to your project. Change your application.css to load Bootstrap and Bootstrap-responsive files in the correct order ("*= require bootstrap.min" before "*= require bootstrap-responsive.min"), and add some basic styling:
wefarm / app / assets / stylesheets / application.css
* This is a manifest file that'll be compiled into application.css, which
* will include all the files listed below.
*
* Any CSS and SCSS file within this directory, lib/assets/stylesheets,
* vendor/assets/stylesheets, or vendor/assets/stylesheets of plugins,
* if any, can be referenced here using a relative path.
*
* You're free to add application-wide styles to this file and they'll appear
* at the top of the compiled file, but it's generally better to create a new
* file per style scope.
*
*= require bootstrap.min
*= require bootstrap-responsive.min
*= require_self
*= require_tree
*/

@media (min-width: 767px) {
body { padding-top: 60px; }
}

a.btn { color: #FFF; }
a.btn:visited { color: #FFF; }

div.navbar div.container a { color: #EEE}
Change the structure application.html.erb file to show a basic Bootstrap structure:
wefarm / app / views / layouts / application.html.erb
<!DOCTYPE html>
<html>
<head>
<title>WeFarm</title>
<meta name="viewport" content="width=device-width, initial-scale=1.0">
<%= stylesheet_link_tag    "application", :media => "all" %>
<%= javascript_include_tag "application" %>
<%= csrf_meta_tags %>
</head>
<body>
<div class="navbar navbar-inverse navbar-fixed-top">
<div class="navbar-inner">
<div class="container">
<button type="button" class="btn btn-navbar" data-toggle="collapse" data-target=".nav-collapse">
  <span class="icon-bar">
  <span class="icon-bar">
  <span class="icon-bar">
</button>
<%= link_to 'WeFarm', root_path, :class => 'brand' %>
<div class="nav-collapse collapse">
  <ul class="nav pull-right">
    <li>
      <%= link_to 'Register' %>
    </li>
    <li>
      <%= link_to 'Login' %>
    </li>
  </ul>
</div>
</div>
</div>
</div>

<div class="container">

<div class="row-fluid">
<div class="span8">
<% if flash.notice %>
  <div class="alert alert-block alert-info">
    <button type="button" class="close" data-dismiss="alert">×
    <%= flash.notice %>
  </div>
<% end %>
<% if flash.alert %>
  <div class="alert alert-block alert-error">
    <button type="button" class="close" data-dismiss="alert">×
    <%= flash.alert %>
  </div>
<% end %>
</div>
</div>

<%= yield %>

</div>

</body>
</html>
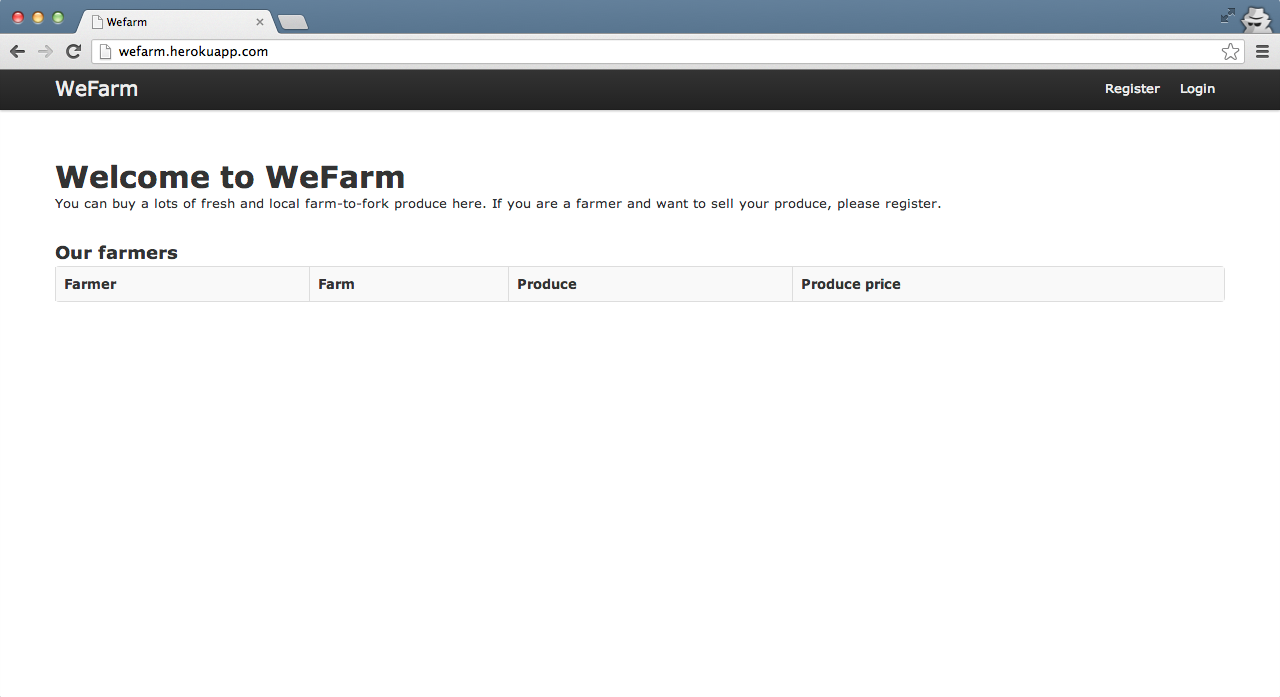
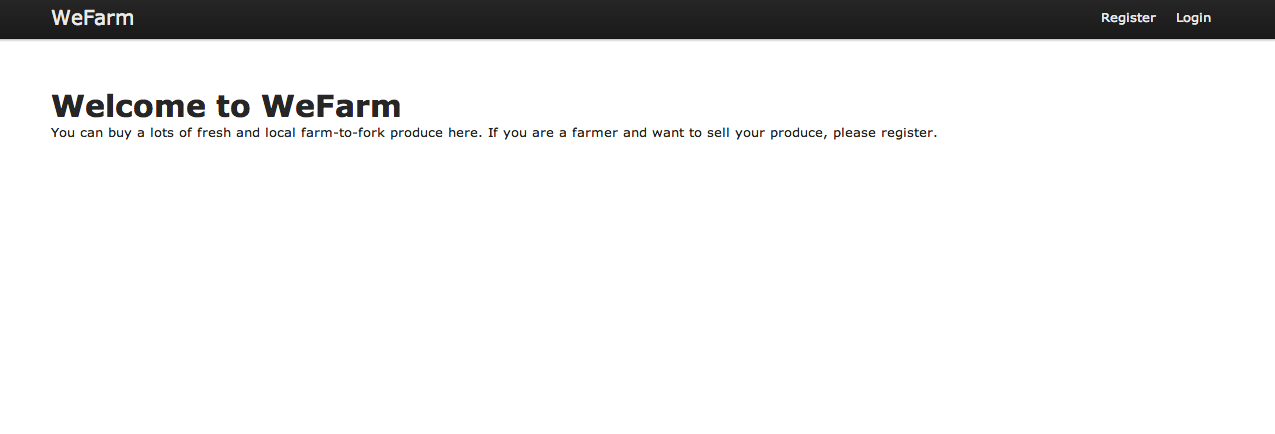
Now that we’ve laid out the basic structure of our website, let’s create a simple homepage. This page will show a list all the Farmers on WeFarm. Create a welcome controller and index view using terminal:
$ rails generate controller welcome index
Change routes.rb to route to the index page:
wefarm / config / routes.rb
root :to => "welcome#index"
And now let’s add a welcome message to welcome/index.html.erb:
wefarm / app / views / welcome / index.html.erb
<h1>Welcome to WeFarm</h1>
<p>You can buy a lots of fresh and local farm-to-fork produce here. If you
are a farmer and want to sell your produce, please register.</p>
Change Gemfile to add relevant gems:
wefarm / Gemfile
gem 'jquery-rails'
gem 'bcrypt-ruby', '~> 3.0.0', :require => "bcrypt"
And finally, run the bundle install command in terminal:
$ bundle install
2. Models
Most real world web applications have complex models and relationships. However, since this is a basic tutorial, let’s simplify the model to have just one object: “farmer”. On the backend, this would be represented by a farmers table. Let’s assume that each farmer has one farm and sells one type of produce. Now we can store the farmer’s name, email, password, farm name, produce and price in a single row.
Generate the Farmer model using rails scaffolding:
$ rails generate scaffold Farmer name:string email:string password_hash:string farm:string
produce:string produce_price:integer wepay_access_token:string wepay_account_id:integer
Now run migrations:
$ rake db:migrate
Next, modify the Farmer model to include validation and proper access to password:
wefarm / app / models / farmer.rb
class Farmer < ActiveRecord::Base
  attr_accessible :email, :farm, :name, :produce, :produce_price, :wepay_access_token, :wepay_account_id, :password

  validates :password, :presence => true
  validates :password, :length => { :in => 6..200}
  validates :name, :email, :presence => true
  validates :email, :uniqueness => { :case_sensitive => false }
  validates :email, :format => { :with => /@/, :message => " is invalid" }

  def password
    password_hash ? @password ||= BCrypt::Password.new(password_hash) : nil
  end

  def password=(new_password)
    @password = BCrypt::Password.create(new_password)
    self.password_hash = @password
  end
end
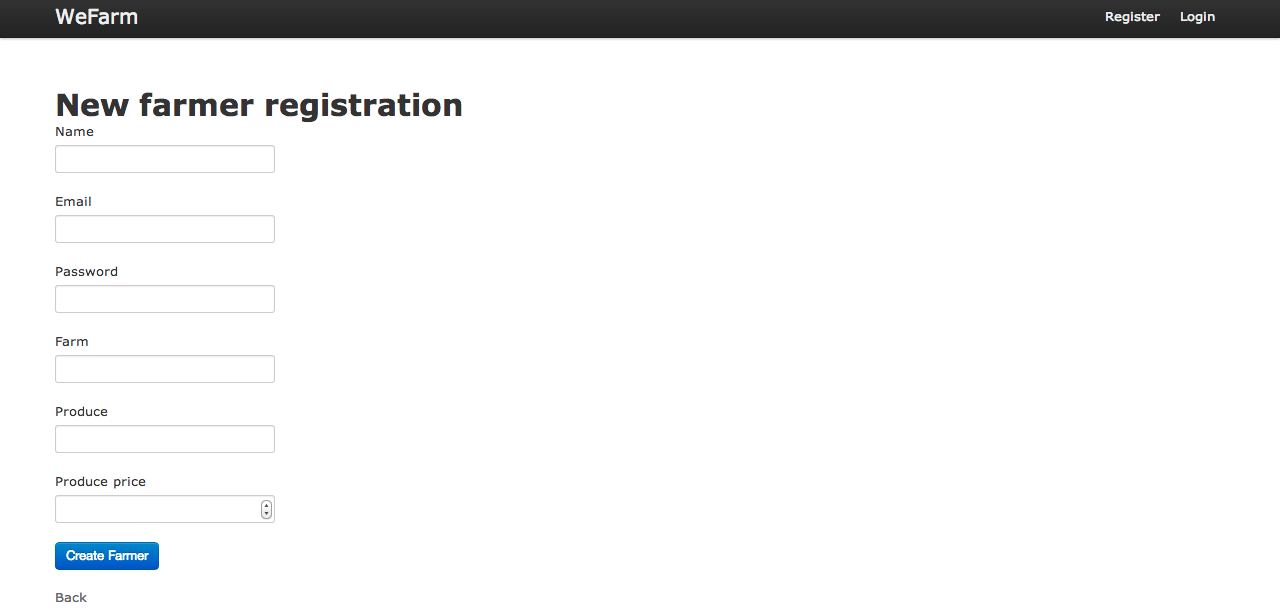
Modify the farmer create form (/app/views/farmers/_form.html.erb) to only accept name, email, password, farm, produce, and price fields. Change the password field type to be “password” and the email field type to be “email”. Also, remove the extra <br /> tags that rails adds.
The _form.html.erb file should look like this:
wefarm / app / views / farmers / _form.html.erb
<%= form_for(@farmer) do |f| %>
  <% if @farmer.errors.any? %>
    <div id="error_explanation">
      <h2><%= pluralize(@farmer.errors.count, "error") %> prohibited this farmer from being saved:</h2>

      <ul>
      <% @farmer.errors.full_messages.each do |msg| %>
        <li><%= msg %></li>
      <% end %>
      </ul>
    </div>
  <% end %>

  <div class="field">
    <%= f.label :name %>
    <%= f.text_field :name %>
  </div>
  <div class="field">
    <%= f.label :email %>
    <%= f.email_field :email %>
  </div>
  <div class="field">
    <%= f.label :password %>
    <%= f.password_field :password %>
  </div>
  <div class="field">
    <%= f.label :farm %>
    <%= f.text_field :farm %>
  </div>
  <div class="field">
    <%= f.label :produce %>
    <%= f.text_field :produce %>
  </div>
  <div class="field">
    <%= f.label :produce_price %>
    <%= f.number_field :produce_price %>
  </div>
  <div class="actions">
    <%= f.submit(:class  => "btn btn-primary") %>
  </div>
<% end %>
Lastly, remove the password, wepay access token, and wepay account fields from /app/views/farmers/show.html.erb. Change routes.rb to route to /farmer/new on /register:
wefarm / config / routes.rb
match 'register' => 'farmers#new', :as => :register
3. User Authentication
Let’s add code to support user authentication and sessions. Refer to railstutorial sessions guide for more info. Add authenticate method to Farmer model:
wefarm / app / models / farmer.rb
def self.authenticate(email, test_password)
  farmer = Farmer.find_by_email(email)
  if farmer && farmer.password == test_password
    farmer
  else
    nil
  end
end
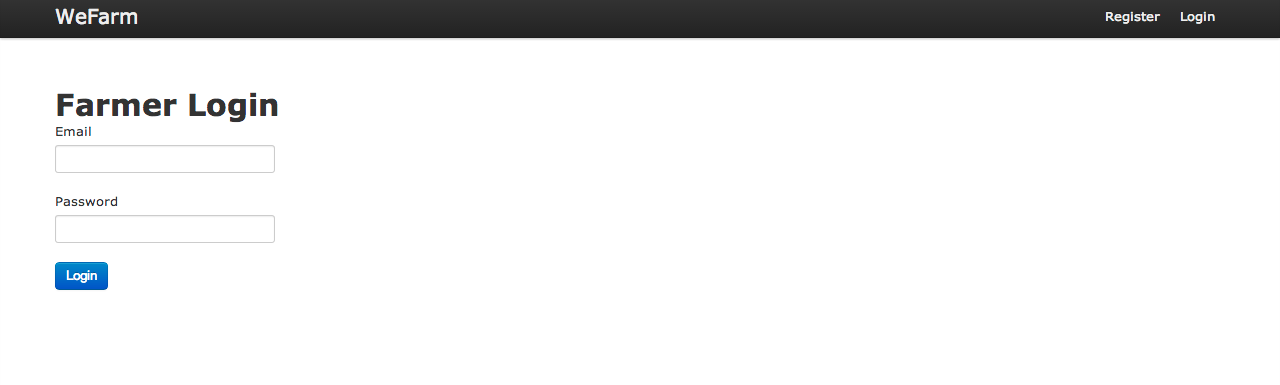
Add a sessions_controller to manage a farmer’s session. Type the following in your terminal:
$ rails generate controller sessions new
Add new, create and destroy methods to sessions_controller:
wefarm / app / controllers / sessions_controller.rb
# GET /sessions/new
def new
end

# POST /sessions
def create
  farmer = Farmer.authenticate params[:email], params[:password]
    if farmer
      session[:farmer_id] = farmer.id
      redirect_to root_path, :notice => "Welcome back to WeFarm"
    else
      redirect_to :login, :alert => "Invalid email or password"
    end
end

def destroy
  session[:farmer_id] = nil
  redirect_to root_path :notice => "You have been logged out"
end
Add the following login form to /sessions/new.html.erb:
wefarm / app / views / sessions / new.html.erb
<%= form_tag "/sessions/create" do %>

<%= label_tag :email %>
<%= email_field_tag :email, params[:email] %>

<%= label_tag :password %>
<%= password_field_tag :password, params[:password] %>

<%= submit_tag "Login", :class => "btn btn-primary" %>

<% end %>
Change the create method in farmers_controller to store the farmer’s id in the session when new farmer is created:
wefarm / app / controllers / farmers_controller.rb
# POST /farmers
def create
  @farmer = Farmer.new(params[:farmer])

  if @farmer.save
    session[:farmer_id] = @farmer.id
    redirect_to @farmer, notice: 'Farmer was successfully created.'
  else
    render action: "new"
  end
end
Add login and logout routes to routes.rb:
wefarm / config / routes.rb
#session
match '/login' => 'sessions#new', :as => :login
match '/logout' => 'sessions#destroy', :as => :logout
post '/sessions/create' => 'sessions#create'
Now that register, login and logout are working, we should show different links on navbar for logged in users. First, add a method to application_controller.rb to get the current_user from elsewhere in the code.
wefarm / app / controllers / application_controller.erb
helper_method :current_user

private
def current_user
  @current_user ||= Farmer.find(session[:farmer_id]) if session[:farmer_id]
rescue ActiveRecord::RecordNotFound
    session[:farmer_id] = nil
end
Change application.html.erb layout to show different links:
wefarm / app / views / layouts / application.html.erb
<% if current_user %>
<li>
<%= link_to 'Logout', logout_path %>
</li>
<% else %>
<li>
<%= link_to 'Register', register_path %>
</li>
<li>
<%= link_to 'Login', login_path %>
</li>
<% end %>
The “Edit” link on farmers view page /farmers/show.html.erb should be accessible only to logged in farmers for their own page. Modify show method in farmers_controller to pass @is_admin variable that tells whether the current user is the admin (owner) of the farm being displayed. Also change the edit and new methods in farmers_controller so that farmers can’t edit other farmers’ data or create new farmers while registered:
wefarm / app / controllers / farmers_controller.rb
# GET /farmers/1
def show
  @farmer = Farmer.find(params[:id])
  @is_admin = current_user && current_user.id == @farmer.id
end

# GET /farmers/new
def new
  if current_user
    redirect_to root_path, :notice => "You are already registered"
  end
  @farmer = Farmer.new
end

# GET /farmers/1/edit
def edit
  @farmer = Farmer.find(params[:id])
  if current_user.id != @farmer.id
    redirect_to @farmer
  end
end
Check for @is_admin in /farmers/show.html.erb view file:
wefarm / app / views / farmers / show.html.erb
<% if (@is_admin) %>
<%= link_to 'Edit', edit_farmer_path(@farmer) %>
<% end %>

4. Integrating the WePay API
The WePay API provides a simple RESTful interface to integrate payments into your marketplace. It supports both buyers and sellers, which is critical for applications like WeFarm. You can see the full documentation here. Rather than access the API directly using HTTP requests, we’ll use the WePay ruby gem.
Add the gem to the project’s Gemfile:
wefarm / Gemfile
gem 'wepay'
Run bundle install in your terminal:
$ bundle install
To make API calls, you’ll need to create an API application on WePay. WePay provides two environments: stage (stage.wepay.com) and production (wepay.com). Stage is used for testing, and production is used when you’re ready to go live. Since this is a test application, create an Application on stage.
After creating your application on WePay, you should see the client_id and client_secret for your app. You’ll need those to initialize a new WePay object. Let’s add these variables to config/development.rb:
wefarm / config / environments / development.rb
#App specific information
CLIENT_ID = 32636
CLIENT_SECRET = "180c800c62"
USE_STAGE = true
WEPAY = WePay.new(CLIENT_ID, CLIENT_SECRET, USE_STAGE)
5. Enabling users to accept payments
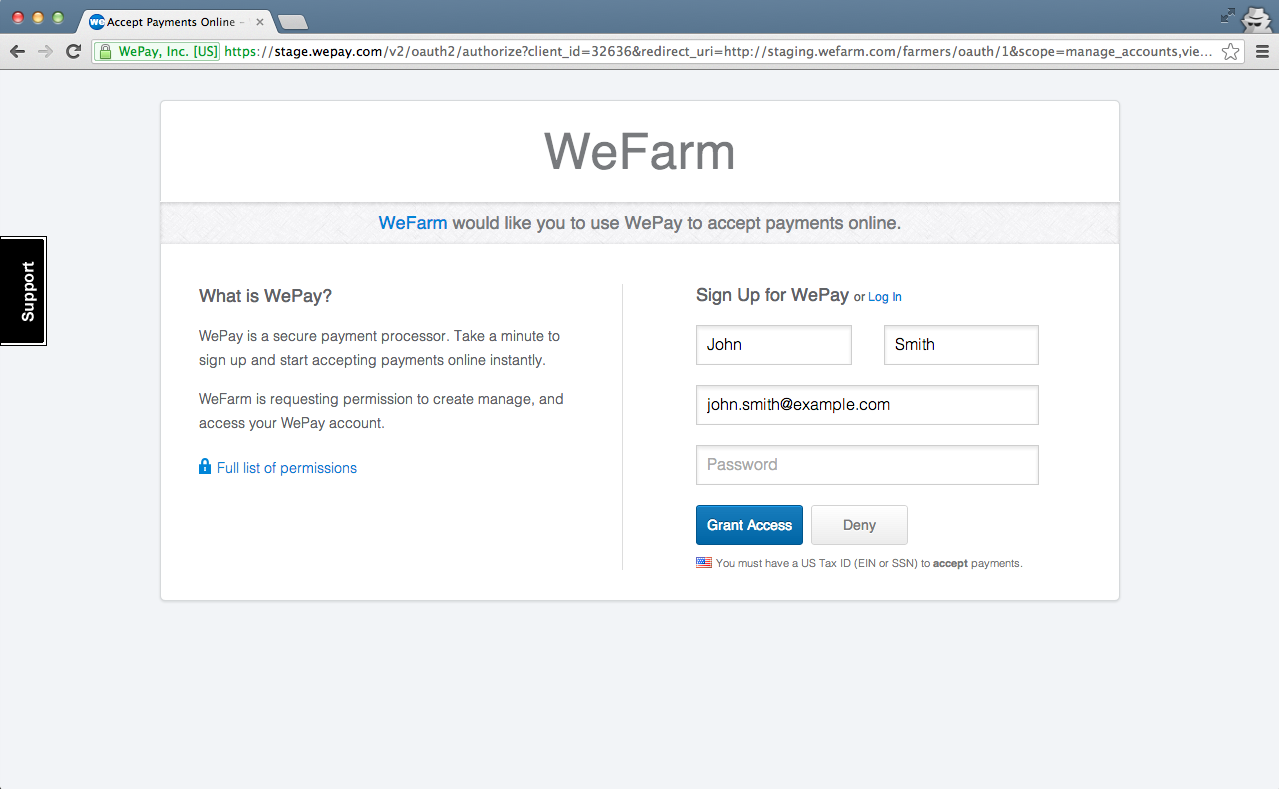
WePay’s OAuth 2.0 flow lets users create a WePay account using a popup on your site. Once your users have provided a name, email, and password, they can start accepting payments instantly.
OAuth 2.0 is an open protocol that allows secure authorization in a simple and standard method from web, mobile and desktop applications. It’s used by popular web services like Facebook and Google. Unlike most services, however, WePay’s OAuth implementation lets a user create a new WePay account in addition to authorizing your application to manage it.
According to the WePay API docs, you can enable your users to accept payments in three steps:
- OAuth2: Get the user’s authorization to create and manage their WePay account.
- Get an access token for the user.
- Create a WePay account for the user using the /account/create call.
We’ll use the WePay ruby gem to get access tokens for Farmers. Simply add methods to the Farmer model to get, store and return the access tokens.
wefarm / app / models / farmer.rb
# get the authorization url for this farmer. This url will let the farmer
# register or login to WePay to approve our app.

# returns a url
def wepay_authorization_url(redirect_uri)
  Wefarm::Application::WEPAY.oauth2_authorize_url(redirect_uri, self.email, self.name)
end

# takes a code returned by wepay oauth2 authorization and makes an api call to generate oauth2 token for this farmer.
def request_wepay_access_token(code, redirect_uri)
  response = Wefarm::Application::WEPAY.oauth2_token(code, redirect_uri)
  if response['error']
    raise "Error - "+ response['error_description']
  elsif !response['access_token']
    raise "Error requesting access from WePay"
  else
    self.wepay_access_token = response['access_token']
    self.save
  end
end

def has_wepay_access_token?
  !self.wepay_access_token.nil?
end

# makes an api call to WePay to check if current access token for farmer is still valid
def has_valid_wepay_access_token?
  if self.wepay_access_token.nil?
    return false
  end
  response = Wefarm::Application::WEPAY.call("/user", self.wepay_access_token)
  response && response["user_id"] ? true : false
end
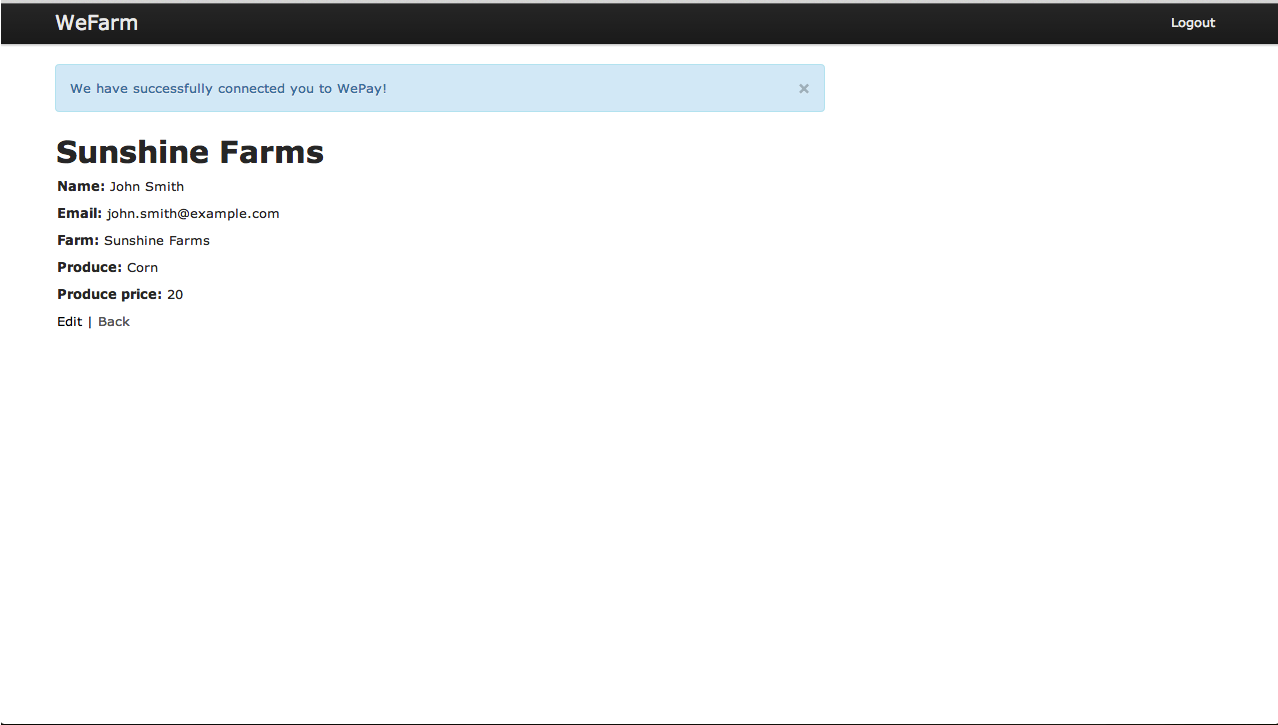
We used /farmers/oauth/farmer_id as the redirect URL, so we need to add the OAuth method to handle it in the farmer_controller:
wefarm / app / controllers / farmers_controller.rb
# GET /farmers/oauth/1
def oauth
  if !params[:code]
    return redirect_to('/')
  end

  redirect_uri = url_for(:controller => 'farmers', :action => 'oauth', :farmer_id => params[:farmer_id], :host => request.host_with_port)
  @farmer = Farmer.find(params[:farmer_id])
  begin
    @farmer.request_wepay_access_token(params[:code], redirect_uri)
  rescue Exception => e
    error = e.message
  end

  if error
    redirect_to @farmer, alert: error
  else
    redirect_to @farmer, notice: 'We successfully connected you to WePay!'
  end
end
Add this route to routes.rb to handle /farmers/oauth/ redirects from WePay:
wefarm / config / routes.rb
match '/farmers/:action(/:farmer_id)', :controller => 'farmers'
To give Farmers the best user-experience, we should create their WePay accounts as soon as we receive their access tokens from WePay.
Add a method to create_wepay_account for the user and modify the request_wepay_access_token method in the farmer model to create an account when we receive the access token:
wefarm / app / models / farmer.rb
# takes a code returned by wepay oauth2 authorization and makes an api call to generate oauth2 token for this farmer.
def request_wepay_access_token(code, redirect_uri)
  response = Wefarm::Application::WEPAY.oauth2_token(code, redirect_uri)
  if response['error']
    raise "Error - "+ response['error_description']
  elsif !response['access_token']
    raise "Error requesting access from WePay"
  else
    self.wepay_access_token = response['access_token']
    self.save

	#create WePay account
    self.create_wepay_account
  end
end


def has_wepay_account?
  self.wepay_account_id != 0 && !self.wepay_account_id.nil?
end

# creates a WePay account for this farmer with the farm's name
def create_wepay_account
  if self.has_wepay_access_token? && !self.has_wepay_account?
    params = { :name => self.farm, :description => "Farm selling " + self.produce }
    response = Wefarm::Application::WEPAY.call("/account/create", self.wepay_access_token, params)

    if response["account_id"]
      self.wepay_account_id = response["account_id"]
      return self.save
    else
      raise "Error - " + response["error_description"]
    end

  end
  raise "Error - cannot create WePay account"
end
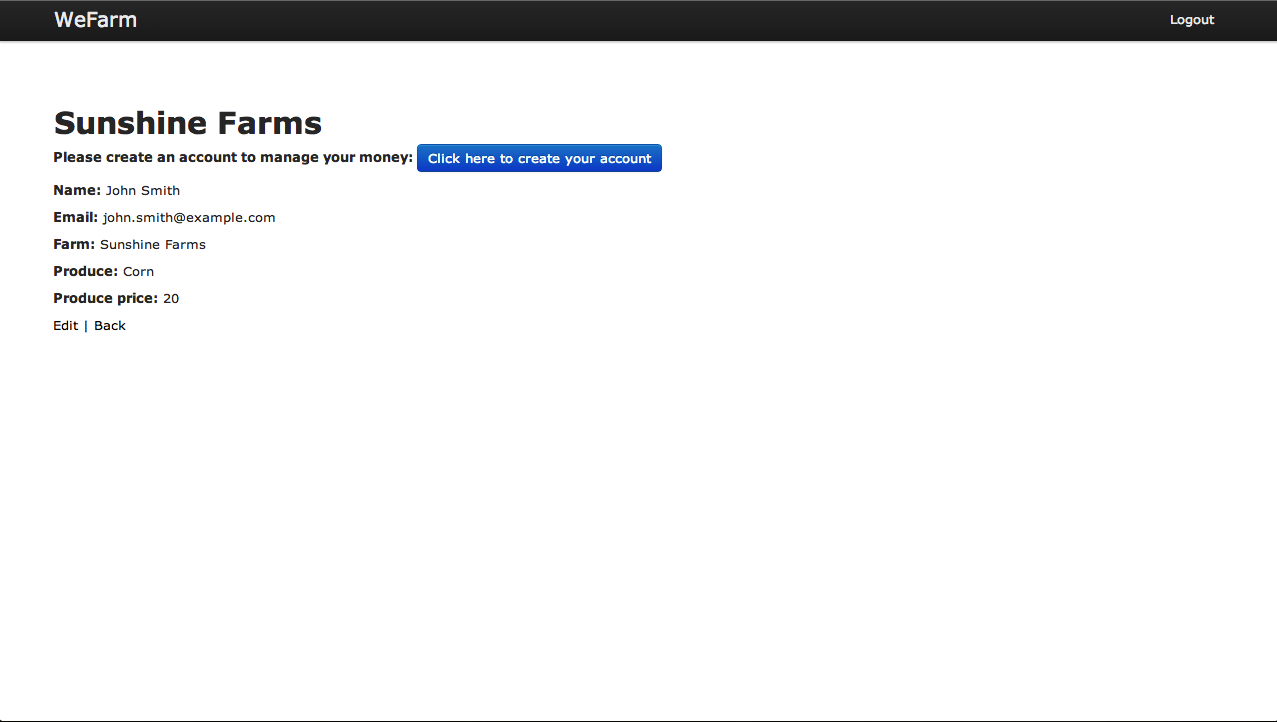
That’s it for OAuth2. Now all we have to do is explain to Farmers that they can start accepting payments by creating an account on WePay. Let’s add a link to the WePay OAuth flow on /farmers/show.html.erb:
wefarm / app / views / farmers / show.html.erb
<% if (@is_admin && (!@farmer.has_valid_wepay_access_token? || !@farmer.has_wepay_account?)) %>
  <p>
    <b>Please create an account to manage your money: </b>
	<% redirect_uri = url_for(:controller => 'farmers', :action => 'oauth', :farmer_id => @farmer.id, :host => request.host_with_port) %>
    <a class="btn btn-primary" href="<%= @farmer.wepay_authorization_url(redirect_uri) %>">Click here to create your account</a>
  </p>
<% end %>
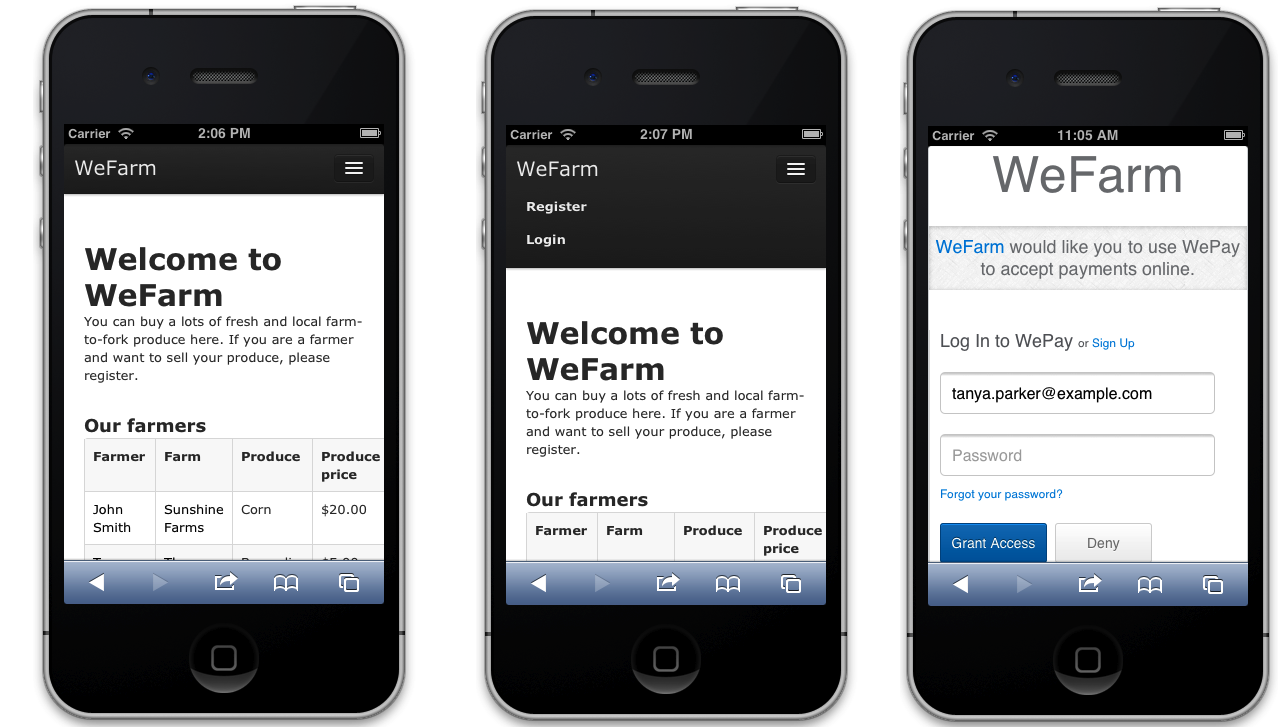
As soon as the Farmer clicks the link, they’re taken to a WePay sign up form, which requires a name, email address, and password.
After the user registers on WePay, they’re redirected back to WeFarm, and we display a success message. They’re now ready to accept payments!
 \
\
6. Integrating checkout
Now that our Farmers are ready to get paid, let’s integrate checkout, so we can charge their customers. We’re also going to add our own app fee to each payment, so we can generate revenue for WeFarm.
WePay supports two ways of collecting payment information. Both are designed to support a seamless user-experience on your platform.
Embedded form
WePay’s iframe checkout is a pre-built checkout form, which handles data validation, most PCI compliance, payment confirmation emails, and more.
Custom form
You can also build your own checkout form. We’ll store the payment information and return a unique token that you can use to charge the customer at any time.
Let’s use the embeddable checkout form to save some time.
To charge customers, we’ll have to implement two steps:
- Create a checkout object on wePay to define the payment (amount, etc.) using the /checkout/create call.
- Get the customer’s payment information using the
checkout_urireturned by the /checkout/create call.
To create a checkout object, make the /checkout/create call using the access_token of the Farmer that’s receiving the payment.
You’ll want to include the following parameters:
| Parameter | Description |
| account_id | WePay account id of the Farmer. |
| short_description | A brief description of the payment. |
| type | "GOODS" in our case |
| amount | The amount of the purchase. |
| app_fee | The fee that we'll charge on top of WePay's fees to generate revenue for your site. Lets charge 10% of the produce price. We'll calculate the appropriate dollar amount on our end. |
| fee_payer | "Payee" in our case. This means that we'll be charging the WePay transaction fees to the Farmer, rather than to his customers. |
| mode | "Iframe" in our case. |
| redirect_uri | The url of our payment confirmation page where WePay will redirect the customers after they've completed their payment. |
Let’s add a create_checkout method to the farmer model that makes a /checkout/create call using WePay API and returns the response:
wefarm / app / models / farmer.rb
# creates a checkout object using WePay API for this farmer
def create_checkout(redirect_uri)
  # calculate app_fee as 10% of produce price
  app_fee = self.produce_price * 0.1

  params = {
    :account_id => self.wepay_account_id,
    :short_description => "Produce sold by #{self.farm}",
    :type => :GOODS,
    :currency => 'USD',
    :amount => self.produce_price,
    :fee => {
        :app_fee => app_fee,
        :fee_payer => 'payee'
    },
    :hosted_checkout => {
        :mode  => 'iframe',
        :redirect_uri => redirect_uri
    }
  }
  response = Wefarm::Application::WEPAY.call('/checkout/create', self.wepay_access_token, params)

  if !response
    raise "Error - no response from WePay"
  elsif response['error']
    raise "Error - " + response["error_description"]
  end

  return response
end
We need two new methods in the farmers_controller. First, a buy method that builds a checkout uri and passes it to its view. Second, a payment_success method that serves as WePay redirect uri for the payment confirmation:
wefarm / app / controllers / farmers_controller.rb
# GET /farmers/buy/1
def buy
redirect_uri = url_for(:controller => 'farmers', :action => 'payment_success', :farmer_id => params[:farmer_id], :host => request.host_with_port)
@farmer = Farmer.find(params[:farmer_id])
begin
@checkout = @farmer.create_checkout(redirect_uri)
rescue Exception => e
redirect_to @farmer, alert: e.message
end
end
# GET /farmers/payment_success/1
def payment_success
@farmer = Farmer.find(params[:farmer_id])
if !params[:checkout_id]
return redirect_to @farmer, alert: "Error - Checkout ID is expected"
end
if (params['error'] && params['error_description'])
return redirect_to @farmer, alert: "Error - #{params['error_description']}"
end
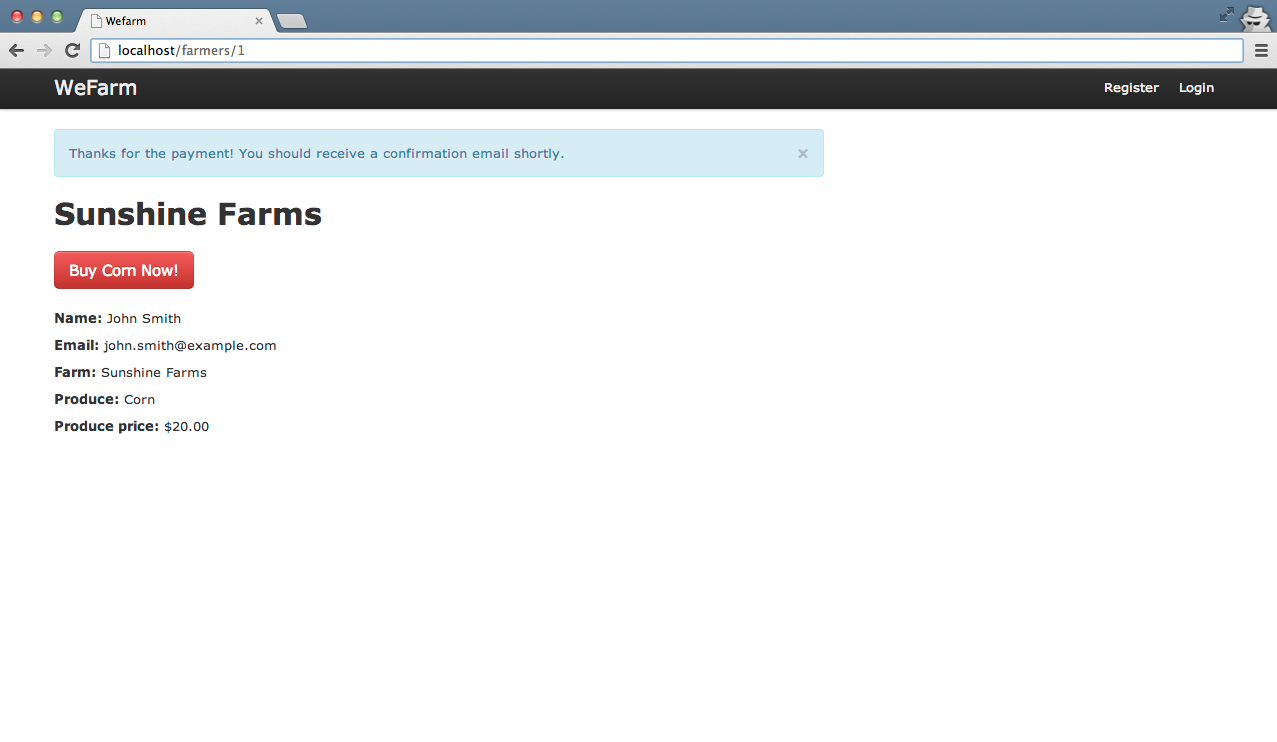
redirect_to @farmer, notice: "Thanks for the payment! You should receive a confirmation email shortly."
end
WePay’s iframe tutorial shows how to link to the WePay javascript library to render the iframe. We’ll use a div tag with id = “wepay-iframe-div” to render the iframe. Just add a new /farmers/buy.html.erb page where users can enter their payment information:
wefarm / app / views / farmers / buy.html.erb
<h1>Buy <%= @farmer.produce %> from <%= @farmer.farm %> for <%= number_to_currency(@farmer.produce_price, :unit => "$") %></h1>
<p><%= link_to "← back to " + @farmer.name + "'s " + @farmer.farm, @farmer %></p>

<div id="wepay-iframe-div">
	<script type="text/javascript" src="https://www.wepay.com/js/iframe.wepay.js">
	</script>

	<script type="text/javascript">
		WePay.iframe_checkout("wepay-iframe-div", "<%= @checkout['checkout_uri'] %>");
	</script>
</div>
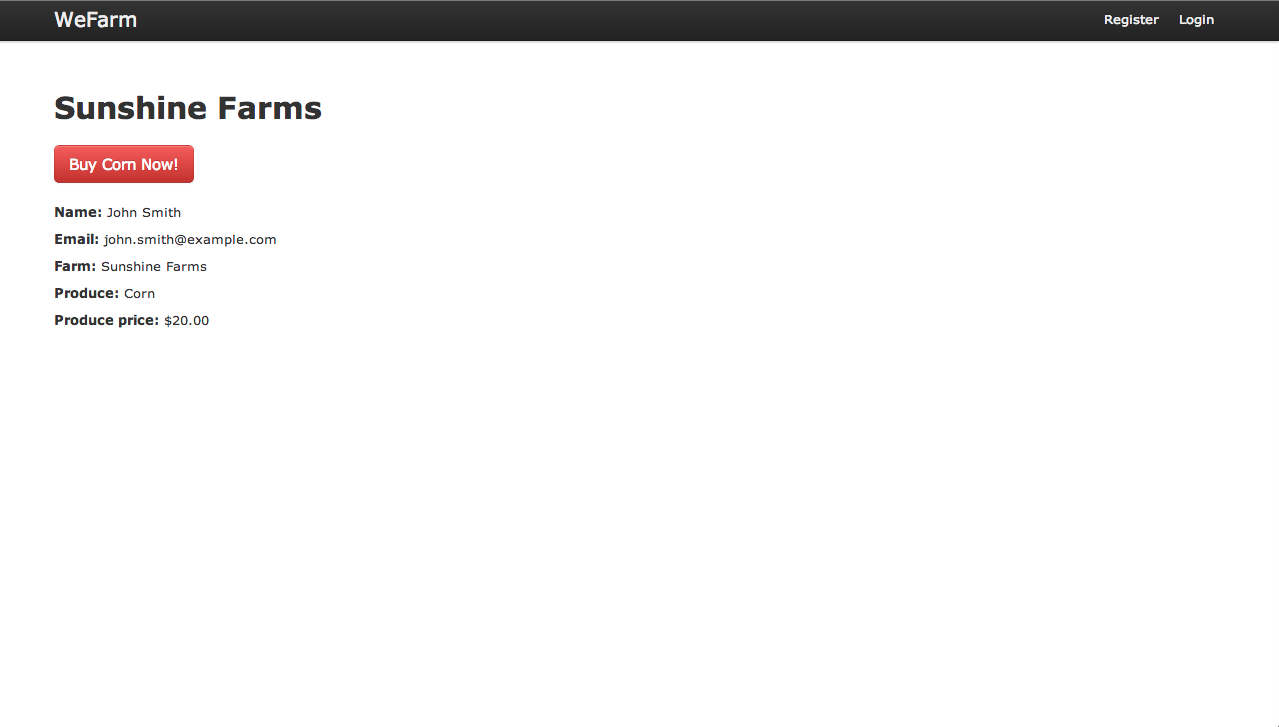
Show a title and buy link on the farmers page in show.html.erb
wefarm / app / views / farmers / show.html.erb
<h1><%= @farmer.farm %></h1>

<% if (@farmer.has_wepay_account? && !@is_admin) %>
<br />
<%= link_to "Buy #{@farmer.produce} Now!", "/farmers/buy/#{@farmer.id}", :class => 'btn btn-danger btn-large', :id => 'buy-now-button' %>
<% end %>
You can add some CSS magic to the button in application.css.
wefarm / app / assets / stylesheets / application.css
#buy-now-button {margin: 20px 0px ;}
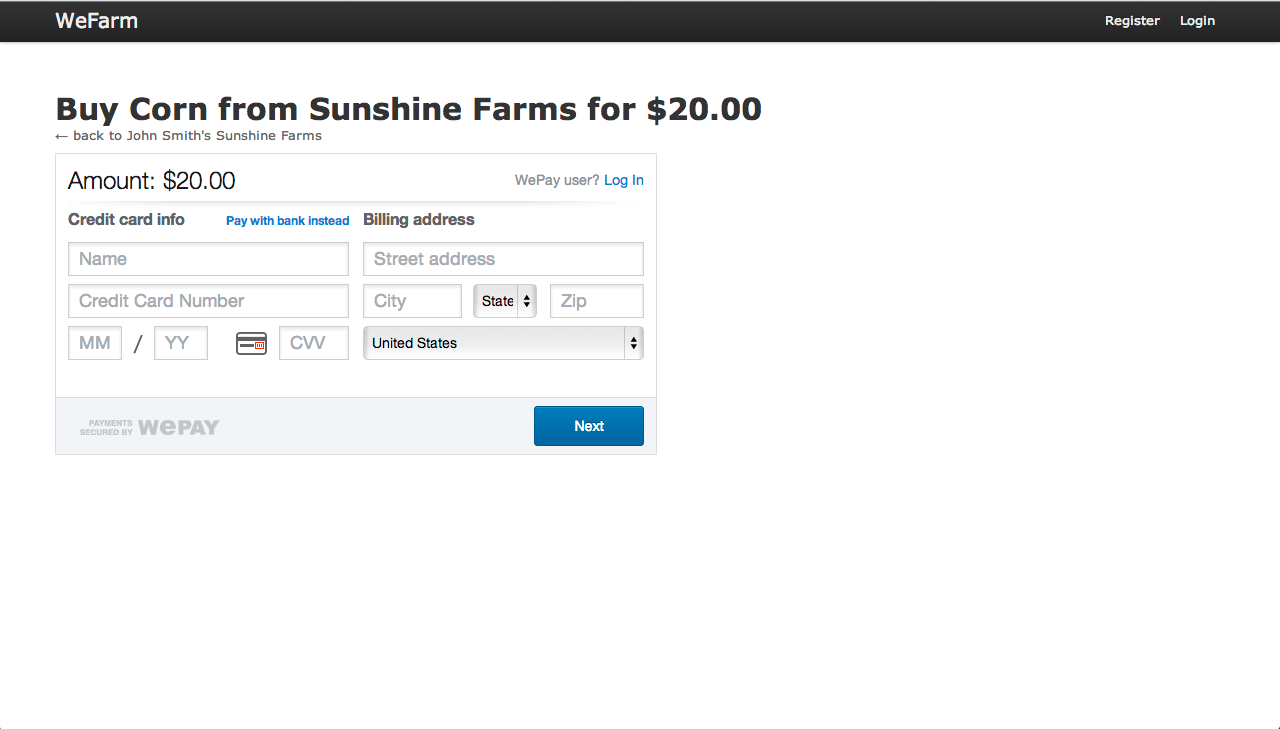
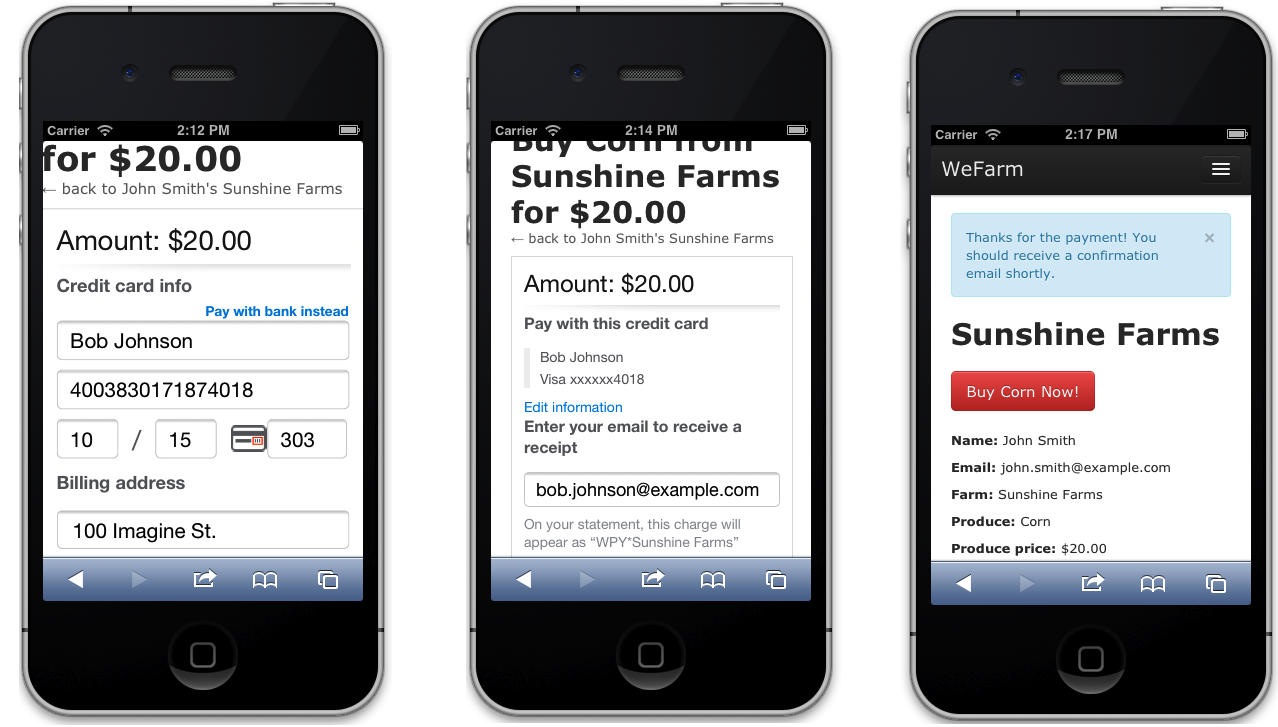
The checkout page with embedded checkout form should look like this:
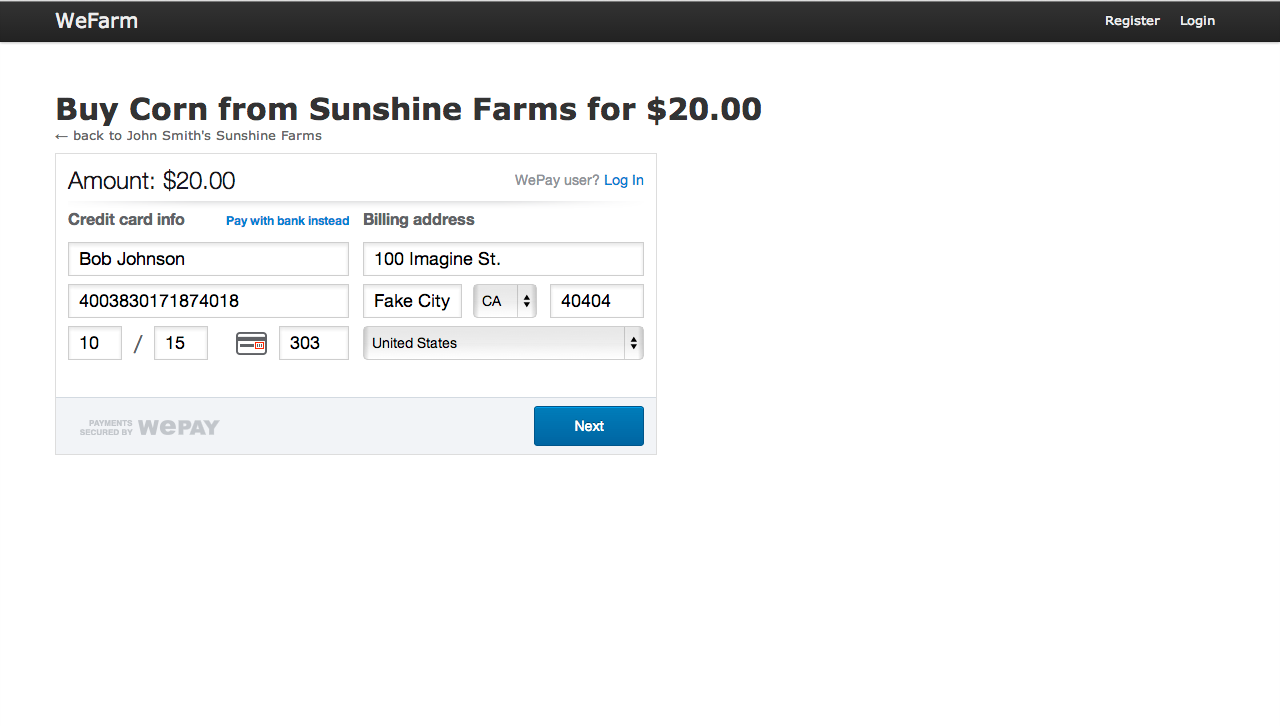
At this point, you are all set to test an actual checkout. The WePay Testing page lists fake credit card numbers that you can use for testing purposes.
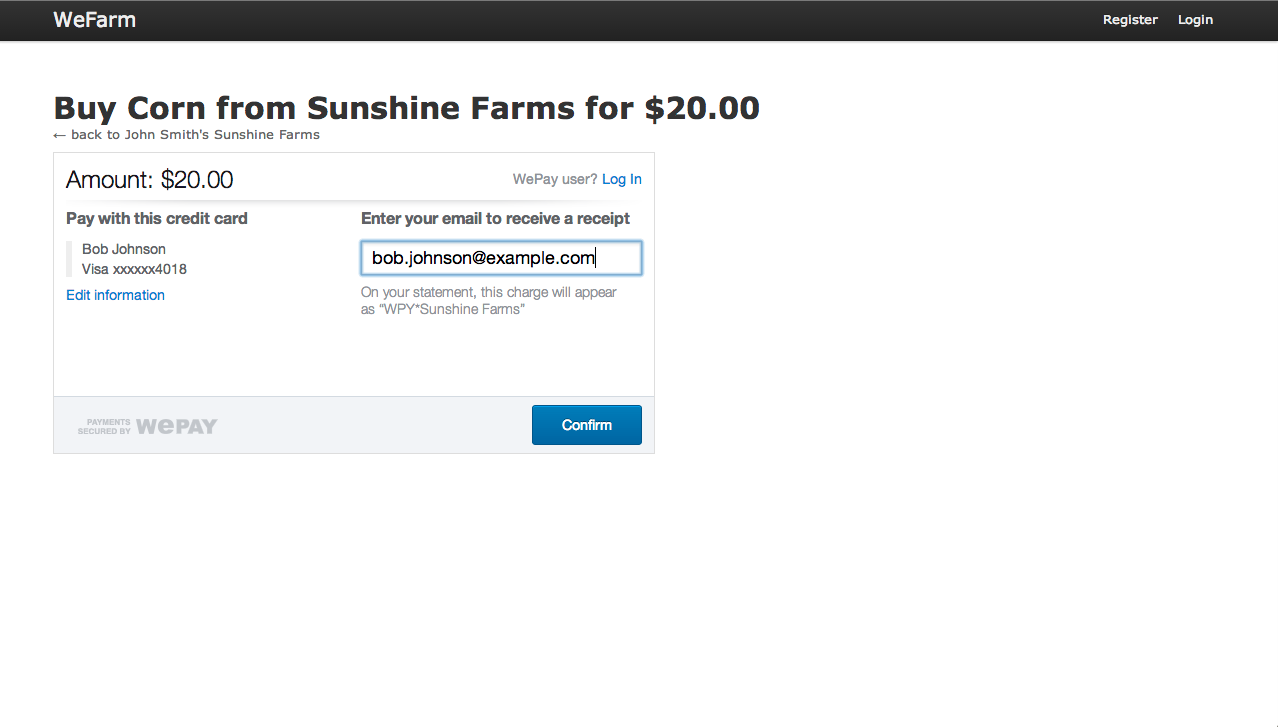
On hitting ‘confirm’ you should see the success page:
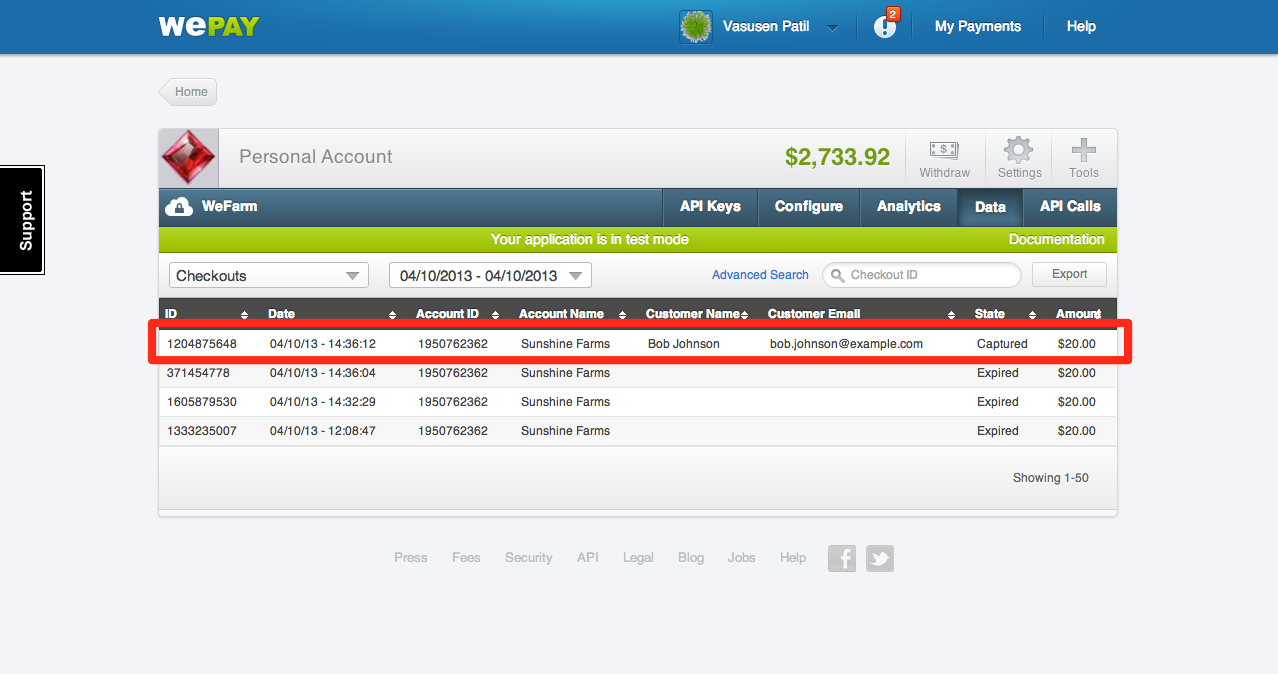
You now have a working checkout experience for your users. Login to stage.wepay.com to see the the checkouts created by your application:
A responsive conclusion
Since we included bootstrap-responsive, our website is already responsive and mobile optimized. The WePay checkout iframe is also automatically mobile optimized. You simply need to change the size of the iframe, and the WePay checkout fields will change accordingly. Add the following CSS to application.css to change the iframe’s size if the device width is less than 480px:
wefarm / app / assets / stylesheets / application.css
@media only screen and (max-width: 480px) {
#wepay-iframe-div { width: 100%;}
#wepay-iframe-div #wepay_checkout_iframe { width: 100%; max-width: 330px; height: 520px;}
}
And it’s not just checkout, all pages on WeFarm are responsive -
Optional - Deploy to Heroku
Seeing your own prototype online is super easy with Heroku - Rails App. Heroku uses PostgreSql database and we have built our app using MySQL. Before pushing to Heroku, we need to remove the mysql gem and add postgre gem. Update Gemfile as follows:
wefarm / Gemfile
#gem 'mysql2', '~> 0.3.10'
gem 'pg'
We will also need to copy our development.rb configs to production.rb configs for Heroku environment. You can also create another app on stage.wepay.com and use its client_id and client_secret if you wish to keep your development and Heroku (production in this case) environments separate. Add the following to production.rb:
wefarm / config / environments / production.rb
CLIENT_ID = 32636
CLIENT_SECRET = "180c800c62"
USE_STAGE = true
WEPAY = WePay.new(CLIENT_ID, CLIENT_SECRET, USE_STAGE)
Run bundle install in terminal:
$ bundle install
Store the app in Git and create Heroku app wefarm:
$ git init
$ git add .
$ git commit -m "init"
Create Heroku app wefarm and deploy code to Heroku:
$ heroku apps:create wefarm
$ git push heroku master
Now the app is pushed to wefarm.herokuapp.com. However, you will get an error:
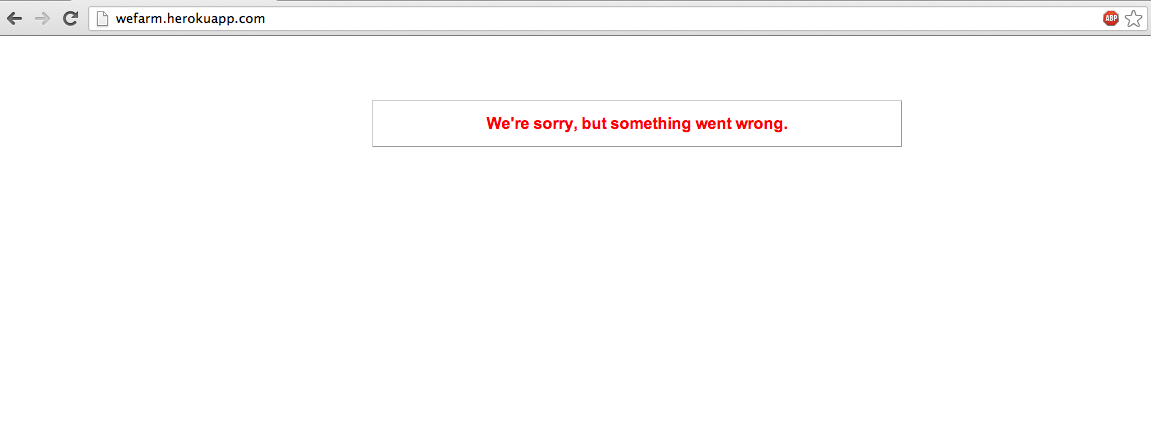
The Heroku logs show that database tables not created. As we used rails scaffolding, we already have database schema and migrations in place. You simply need to run the rake schema load command for database on Heroku:
heroku rake db:schema:load
Now we have a working online demo for WeFarm! Go check it out!